DIY Guide: Installing Your Perfect Fireplace Mantel
Installing a fireplace mantel is one of those projects that combines practicality and beauty. It’s not just about creating a place to hang stockings or display family photos—it’s about transforming your fireplace into a true centerpiece. If the idea of tackling this project sounds daunting, I promise, it’s not as hard as it seems. With some basic tools, patience, and a little help, you’ll have your mantel up and ready to admire in no time. Installing a fireplace mantel isn’t just about aesthetics—it’s about creating a centerpiece for your room, a spot for family photos, seasonal décor, or even that TV you’ve been debating mounting. The good news? With the right approach and tools, installing a mantel is entirely doable for most homeowners. Whether you’re going for a modern floating shelf or a classic surround, this guide will walk you through every step. And since it’s me, Nadia, you can count on a few chuckles along the way!
So, let’s get started on this fireplace adventure, step by step.
What’s the Big Deal About a Mantel?
First, let’s take a moment to appreciate the role of a fireplace mantel. It’s more than just a decorative shelf; it’s a functional and protective element. A properly installed mantel shields walls from heat and provides a platform for all the seasonal decorations your heart desires.
But it’s not just about looks—there are important safety considerations, too. Building codes dictate specific clearance requirements to keep combustible materials away from the fire. So, before you dive in, it’s essential to get familiar with these rules.
| Aspect | Details |
|---|---|
| Skill Level | Beginner-Friendly (1 out of 5) |
| The Tricky Part | Lifting the mantel can be awkward, but putting it together and securing it is straightforward. |
| Budget Range | $500 to $3,200 (depending on size, design, and materials) |
| Time Commitment | Plan for a morning or afternoon—about half a day. |
Tools You’ll Need
Before we get to work, gather your tools. Here’s your fireplace mantel installation starter pack:
Essential Tools
Caulk gun
Hammer drill
Level (a 3-foot one works best)
Masonry bit (3/16-inch)
Saw
Screwdriver
Tape measure
Optional but Helpful
Safety goggles and a dust mask
Stud finder (if your wall has wood studs)
Sandpaper for touch-ups
Paintbrush or stain applicator for finishing
Wood glue for assembly
Having everything on hand will save you from multiple trips to the toolbox—or worse, the hardware store.

Choosing the Right Mantel
Not all mantels are created equal, so before you start installing, let’s talk about picking the right one.
Mantel Types
Mantel Shelf: A simple, horizontal shelf mounted above the fireplace. Perfect for modern or minimalist designs.
Full Mantel Surround: Includes both the shelf and vertical legs that frame the firebox. A classic choice for traditional homes.
Floating Mantels: Sleek and contemporary, these appear to “float” without visible supports.
Materials
Wood: Classic and versatile but requires careful attention to fire safety clearances.
Stone: Durable and elegant, ideal for high-end or rustic looks.
MDF (Medium Density Fiberboard): Budget-friendly and easy to paint, but not suitable for humid environments.
Metal: Modern and industrial, great for contemporary spaces.
Step-by-Step Wood Fireplace Mantel Installation
Step 1: Assemble the Mantel

Assemble Legs If Needed
Most mantels come in pieces that you’ll need to put together. Here’s how to do it:
Prep the Pieces: Sand, prime, or stain your mantel before assembly. Wait to apply the final coat until after installation.
Assemble Safely: Place the mantel shelf top-down on a soft, protective surface.
Attach the Legs: Slide the legs onto the shelf, aligning the dowels with their corresponding holes. Wiggle gently to ensure a snug fit.
Secure with Hardware: Twist the screws a quarter-turn to lock the cams in place. (The exact process may vary depending on your mantel’s design.)
Pro Tip: Pre-assembling as much as possible saves time later—and ensures everything fits together as it should.
Step 2: Dry-Fit the Mantel

Dry Fit And Mark Top Of Mantel
This step helps you visualize the final placement and check for any adjustments needed.
Position the Mantel: Have someone hold the mantel in place while you center it around the firebox.
Level It Out: Use a 3-foot level to ensure the shelf is level from left to right. For front-to-back leveling, use a torpedo level.
Trace the Outline: Lightly trace the mantel’s shape on the wall with a pencil. This will serve as a guide for cleat placement.
Adjust as Needed: If the mantel isn’t perfectly level, place shims under the legs to correct it.
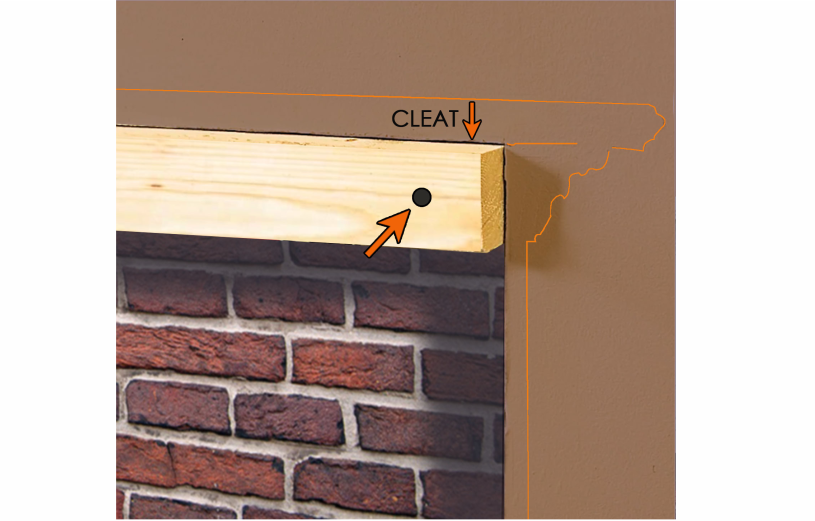
Step 3: Position the Cleats
Cleats provide the structural support your mantel needs to stay secure.

Measure Inside Hight Of Mantel For Cleat Height
Measure for the Top Cleat: Measure the inside width of the mantel shelf and cut a 2×4 to this length.
Cut Leg Cleats: Measure the length and depth needed for the vertical cleats that will support the legs. Cut accordingly.
Dry-Fit: Place the cleats inside the mantel to ensure they fit snugly.
Step 4: Bore Pilot Holes
Bore Some Pilot Holes Into Cleat
Preparing pilot holes ensures the cleats are securely attached to the wall.
Mark the Wall: Measure and mark where the cleats will attach, using your pencil outline as a guide.
Drill Pilot Holes: Use a hammer drill with a carbide-tipped masonry bit to drill 1/2-inch pilot holes into the wall.
Avoid Mortar: Always drill into the brick itself for a more secure hold. Mortar is too brittle for reliable support.
Step 5: Attach the Cleats

Mount Cleat Into Wood Stud
With the pilot holes ready, it’s time to mount the cleats.
Secure the Top Cleat: Switch your drill to drill-only mode and fasten the top cleat to the wall with 2 1/2-inch concrete screws.
Attach the Side Cleats: Repeat the process for the vertical cleats, ensuring everything is level and aligned.
Double-Check: Make sure the cleats are tightly secured—they’re the foundation for your mantel.
Step 6: Install the Mantel

Install Mantel And Secure Everything
Now comes the exciting part—putting the mantel in place!
Fit Over Cleats: Carefully slide the mantel over the cleats, aligning it with the outline on the wall.
Press Flush: Ensure all edges are flush against the wall.
Secure with Screws: Drive 2-inch finish screws every 16 inches along the back of the shelf and the edges of the legs. Keep screw heads slightly recessed for a clean finish.
Step 7: Secure Everything

Install the Trim Pieces/Scribes
This step ensures your mantel is stable and ready for its starring role.
Add Trim Screws: Use a Phillips screwdriver bit to drive screws into the back of the shelf and sides of the legs.
Check Stability: Give the mantel a gentle shake to ensure it’s securely attached.
Step 8: Finishing Touches
Now it’s time to make your mantel picture-perfect.
Fill Screw Holes: Use wood filler or putty to conceal screw heads. For unpainted mantels, wood plugs can also work.
Add Trim: Attach thin edge molding to cover gaps between the mantel and the wall.
Apply the Final Coat: Paint or stain your mantel for a polished, professional look.
Caulk Gaps: If you’re painting, caulk any remaining gaps between the mantel and the wall for a seamless finish.
Safety and Clearance Considerations
Before you light your first fire with the new mantel, double-check that you’ve met all safety requirements:
Clearance from Firebox: Combustible materials must be at least 6 inches away from the firebox opening, with additional clearance for every 1/8 inch the mantel projects outward.
Local Codes: Always check your local building codes for any specific requirements.
FAQs About Fireplace Mantel Installation
1. Do I need professional help to install a mantel?
Not necessarily! If you’re comfortable with basic tools and measurements, you can handle most wood or MDF mantels. Stone mantels, however, may require professional installation due to their weight and complexity.
2. How long does it take to install a mantel?
For a standard mantel, expect the project to take about 4–6 hours. Custom or heavy mantels may take longer.
3. Can I install a mantel on a prefabricated fireplace?
Yes, but you’ll need to follow the manufacturer’s guidelines to ensure proper clearances and compatibility.
Creative Ideas for Your Mantel
Once your mantel is installed, it’s time to have fun decorating! Here are a few ideas to get you started:
Seasonal Displays: Swap out decorations for each season—think pumpkins in fall, garlands in winter, and fresh flowers in spring.
Art and Mirrors: A large mirror or piece of art can make your fireplace the room’s focal point.
Lighting: Add LED candles or string lights for a cozy glow.
Final Thoughts
Installing a fireplace mantel is a rewarding DIY project that adds character and function to your home. With careful planning, the right tools, and a step-by-step approach, you can achieve a professional-looking result. So go ahead—give your fireplace the makeover it deserves, and enjoy the warm, inviting centerpiece you’ve created!